LES MIRACLES N'ONT LIEU QU'UNE FOIS ...
I MIRACOLI NON SI RIPETONO ...
MIRACLES ONLY HAPPEN ONCE ...
But you too can make Jerome's origami swan with flapping
wings!
Getting Started...
All you need is a piece of paper (make it square if it isn't already) and
a hard surface.
Note: Using relatively thin paper, folding straight along the edges and
creasing hard with your fingernail will make this easier.
1. Fold your square diagonally.
Turn your square into a triangle by folding one corner to the corner
directly opposite and creasing the long edge of your newly formed triangle.
Unfold and repeat with the other two corners, forming yet another
triangle and again creasing the long edge. Again unfold.
Your square should now have two diagonal folds that intersect at the
center and lift the corners of the square unsteadily off the table top.
2. Flip your square over and fold vertically and horizontally.
Flip your square piece of paper over. It should lift up slightly in
the center like a tent. Now fold it in half vertically, bringing the
left edge to the right edge and creasing the long edge of the resulting
rectangle.
Unfold and repeat horizontally, bringing the bottom edge to the top edge
and again creasing the long edge of the rectangle. This time, don't
unfold.
3. Bring the corners together to make a folded square.
Holding your rectangle with one hand on each of the open corners at the
top -- the folded edge of the rectangle should be at the bottom -- and bring
all four corners of your original square together, letting the top edges of
your rectangle bow out.
 Holding
the corners together, flatten your new figure into a new, smaller square.
Turn it on an angle so the diagonal fold is running top-to-bottom through
the middle, with the open end (the corners of your original square) at the
bottom, and the closed end at the top. Holding
the corners together, flatten your new figure into a new, smaller square.
Turn it on an angle so the diagonal fold is running top-to-bottom through
the middle, with the open end (the corners of your original square) at the
bottom, and the closed end at the top.
Make sure your new, smaller square has two flaps on each side of the
diagonal center line. (You don't want three on one side and one on the
other).
4. Make a kite shape.
 With
the open end of your new square at the bottom, and the closed end at the
top, grasping only the top flap of the paper, fold the lower right (open)
edge of your square in toward the middle so it runs parallel ( || ) to the
top-to-bottom diagonal line and the right corner is about 3/4 up the
top-to-bottom diagonal line. Crease you new lower-right edge. With
the open end of your new square at the bottom, and the closed end at the
top, grasping only the top flap of the paper, fold the lower right (open)
edge of your square in toward the middle so it runs parallel ( || ) to the
top-to-bottom diagonal line and the right corner is about 3/4 up the
top-to-bottom diagonal line. Crease you new lower-right edge.
Repeat with the top flap of the left side, folding the lower left (open)
edge of your square in toward the middle so it runs parallel ( || ) to the
top-to-bottom diagonal line and the left corner meets the right corner about
3/4 of the way up. The top side of your square should now look like a
kite.
Flip your square over on the table and repeat step 4 on the other side of
your square so both the top and bottom sides look like a kite. (All
the open edges of your original square should now be in the middle.)
5. Fold the top of the kite down.
 Take
the top (closed) end of your kite shape and fold it along the horizontal
axis of your new kite shape, creating a smaller triangle (the top of your
kite) on top of a larger triangle (the bottom of your kite). Crease
the new edge hard. Take
the top (closed) end of your kite shape and fold it along the horizontal
axis of your new kite shape, creating a smaller triangle (the top of your
kite) on top of a larger triangle (the bottom of your kite). Crease
the new edge hard.
Unfold the top of your kite (returning to the previous kite shape), flip
the kite over, and repeat the above step again on the other side, folding
along the same crease you created above. Unfold. The top part of
your kite should now bend easily forward and backward.
6. Invert your kite.
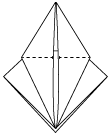 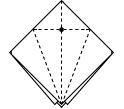 Unfold
the kite shape on the top and bottom sides of your figure, bringing the old outside (open)
edges out from the middle of the kite and returning them to their previous
positions on the lower left and right sides of your square. Unfold
the kite shape on the top and bottom sides of your figure, bringing the old outside (open)
edges out from the middle of the kite and returning them to their previous
positions on the lower left and right sides of your square.
Now grab the bottom (open) corner of the top side of your figure and
bring it up past the top of your old kite so the left and right corners of
your square fold in towards each other and meet in the exact middle,
creating a new tall diamond
shape with a slit down the middle.
Flip your diamond over and do the same thing to the other side, raising the bottom
(open) corner up so that the left and right corners come in, creating
another long diamond shape with a slit down the middle.
Flatten your new diamond shape and crease the outside edges.
7. Fold down the neck and tail.
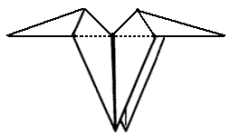 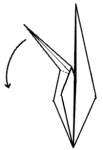 With the split end of your new diamond at the top, pull the left half of
the top corner down 90-degrees between the top and bottom flaps on the left
side of your diamond and toward the left corner, inverting the (formerly
vertical) middle crease so it is now folding the other way and laying
perpendicular ( _| ) to the remaining half of the middle crease. With the split end of your new diamond at the top, pull the left half of
the top corner down 90-degrees between the top and bottom flaps on the left
side of your diamond and toward the left corner, inverting the (formerly
vertical) middle crease so it is now folding the other way and laying
perpendicular ( _| ) to the remaining half of the middle crease.
Repeat this with the remaining right half of the diamond's top corner,
pulling it down between the flaps on the right side toward the right corner
of the diamond, inverting the crease so it is laying perpendicular ( |_ ) to
what's left of the middle crease.
The bottom half of your diamond should be intact, while the top half
should now have a 'V' in the middle and two arms sticking straight out from
each side, looking somewhat like a suspension bridge.
8. Change the angle of the neck and tail.
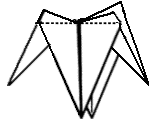 Find the former left corner of your diamond (now in line with the bottom
edge of the left side of your suspension bridge). Find the top corner
of the left side of your suspension bridge (the highest angle). Find the former left corner of your diamond (now in line with the bottom
edge of the left side of your suspension bridge). Find the top corner
of the left side of your suspension bridge (the highest angle).
Pull the left arm of your suspension bridge down even farther between the
flaps until the top corner of your suspension bridge inverts and aligns with
what used to be the left corner of your diamond. Crease the new left
edge of your 'V'.
Repeat this with the right arm of your suspension bridge, pulling it
farther down between the flaps until the highest angle on the right side
inverts and meets the right corner of your old diamond. Crease the new
right edge of your 'V'.
9. Add the head.
 Turn your figure so that the three longest points are pointing up -- so
it looks like a three-pointed crown, or a 'W' whose middle is taller than
its sides. Turn your figure so that the three longest points are pointing up -- so
it looks like a three-pointed crown, or a 'W' whose middle is taller than
its sides.
Much as you pulled down the top corner of the diamond to create the arms
of the suspension bridge in Step 7, grab the end of one side of your 'W' and
bend it down a little ways between its flaps to create a head on the neck of
your swan. Your 'W' should now be 'broken' on one side.
10. Bend the wings.
Without actually putting a hard crease in them, curl the center points of
your 'W' out away from each other and down, angling the tips of your wings
slightly forward towards the swan's head (and away from its tail).
Along the underside center of each wing, where the two open edges meet,
make sure the open edge closest to the tail of the swan is free and not in
any way overlapped by the open edge closest to the swan's head. (If it
gets tucked under, your swan won't flap its wings very well.)
11. She's done! Now make her flap!
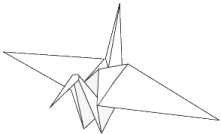 You've done it! Now, to make your swan flap her wings, hold her
chest with one hand (the bottom corner of your 'W' where the neck meets the
body) and gently pull out on the end of her tail (the non-'broken' side of
the 'W'). You've done it! Now, to make your swan flap her wings, hold her
chest with one hand (the bottom corner of your 'W' where the neck meets the
body) and gently pull out on the end of her tail (the non-'broken' side of
the 'W').
The paper shouldn't tear, so if you notice resistance to your
tail-pulling and the wings aren't flapping much, try loosening things up:
- On the underside of each wing in the middle, stick a finger under
the open edge closest to the tail of the swan and pull it out a little,
creating a gap between that edge and the top of the wing, giving the
back side of the wings a little depth (and causing them to curl down
more).
- Widen the base of the tail by putting a thumb and forefinger on
either side of the base of the tail, between the tail and the wings, and
moving your thumb and forefinger apart. The tail will get flatter
at the base, giving the swan a wider rear-end and freeing up the
connection between the tail and the wings.
| 


![]() Printer-friendly version.
Printer-friendly version.
![]() Return
to the top.
Return
to the top.


 With
the open end of your new square at the bottom, and the closed end at the
top, grasping only the top flap of the paper, fold the lower right (open)
edge of your square in toward the middle so it runs parallel ( || ) to the
top-to-bottom diagonal line and the right corner is about 3/4 up the
top-to-bottom diagonal line. Crease you new lower-right edge.
 Take
the top (closed) end of your kite shape and fold it along the horizontal
axis of your new kite shape, creating a smaller triangle (the top of your
kite) on top of a larger triangle (the bottom of your kite). Crease
the new edge hard.
 Unfold
the kite shape on the top and bottom sides of your figure, bringing the old outside (open)
edges out from the middle of the kite and returning them to their previous
positions on the lower left and right sides of your square.
 With the split end of your new diamond at the top, pull the left half of
the top corner down 90-degrees between the top and bottom flaps on the left
side of your diamond and toward the left corner, inverting the (formerly
vertical) middle crease so it is now folding the other way and laying
perpendicular ( _| ) to the remaining half of the middle crease.
 Find the former left corner of your diamond (now in line with the bottom
edge of the left side of your suspension bridge). Find the top corner
of the left side of your suspension bridge (the highest angle).
  Turn your figure so that the three longest points are pointing up -- so
it looks like a three-pointed crown, or a 'W' whose middle is taller than
its sides.
 You've done it! Now, to make your swan flap her wings, hold her
chest with one hand (the bottom corner of your 'W' where the neck meets the
body) and gently pull out on the end of her tail (the non-'broken' side of
the 'W').


